Intro & File Management
Welcome to Day 2: Automation & Scaling

Welcome back! Previously, we established the foundational skills needed to navigate the command line, manage directories, and install software. Today, we are shifting our focus from navigating to automating.
In modern research computing, especially when dealing with massive data outputs like high-throughput sequencing or complex array jobs, manually running commands one by one simply doesn't scale. The raw output of these experiments is usually in the form of large text files spread across complex directory structures.
The true power of the Unix command line lies in its ability to string together small, highly optimized tools to do the heavy lifting for you. In this advanced session, you will learn how to:
- Batch Process: Execute commands across thousands of files simultaneously.
- Parse Text: Extract, filter, and compute data directly from large files without ever opening them.
- Automate: Write reusable shell scripts so you never have to type the same complex command twice.
- Compute Remotely: Securely transfer your data and keep your pipelines running on High-Performance Computing (HPC) clusters, even after you close your laptop.
If you can master just a handful of these advanced commands, you will fundamentally change how quickly and efficiently you can process your research data. Let's dive in.
Learning Objectives
By the end of this section, you should be able to:
- Locate files across nested directory structures with
find - Run commands over many files with
-exec,xargs, andparallel - Choose symbolic links over copying when organizing large datasets
- Monitor storage with
df,du, andncdu
Advanced File and Directory Management
1. Finding and Processing Many Files
Batch Processing and Working with Multiple Files
Often times researchers have to deal with large datasets comprised of a lot of smaller individual files. Linux has some utilities to help work with multiple files in an automated fashion. The utilities we will be covering in this section are: find, xargs, parallel, for loops in BASH, symlinks/hardlinks, du, df, and ncdu.
First, we need to download the example data to a folder for this training. Let's all create a unix_adv_workshop folder and transfer the example data into there. This dataset is a Bioinformatics dataset of gut microbiome sequencing. The data is compressed in .gz format.
mkdir unix_adv_workshop
cd unix_adv_workshop
wget https://biox.unr.edu/ftp/workshop_data/testdata1.tar.gz
tar -xvzf testdata1.tar.gz
cd testdata1
Let's use the find command to find data files within this directory structure. We can use the find command with the * glob character in order to match anything that would replace the *. We want to find all files that end with .gz, therefore, we would use *.gz in the find command.
Let's review the output for this command. You will notice it each line contains the location to one of the files that matches the *.gz pattern. However, you may notice this data isn't organized very well. Some of the sets have the data at the top directory, some have multiple layers of sub directories where the .gz files are located. Also, notice that some files end with .fastq.gz and others with .txt.gz.
Let's update the command to only operate on .fastq.gz files.
Review the output and ensure that only .fastq.gz files are printed.
Now that we are finding our correct files, we want to get some preliminary Quality Control information about this data. We can have find run a utility for each file that gets returned. In this case, we want to run ls for each file so that we can get the file sizes for the dataset.
In order to do this, we will add the -exec flag, which executes another command for every file returned by find. The file name found by find is replaced with {}. The \; marks the end of the command passed to -exec.
Great, we have a list of file sizes for everything. However, what if some of the files had different case than what we wrote in the -name search? Since Unix is case-sensitive, our find command would not find those files. Instead, we can use the -iname option for a case-insensitive search.
Now, let's try to get the number of lines in each file using wc -l. Our data is compressed, so we need zcat to uncompress on the fly, then pipe into wc -l.
This command runs, but it gives one combined total rather than one result per file. For per-file output, xargs and parallel are clearer.
find . -type f -iname "*.fastq.gz" -print0 | xargs -0 -I {} sh -c 'echo -n "{}: "; zcat "{}" | wc -l'
find . -type f -iname "*.fastq.gz" | parallel 'echo -n "{}: "; zcat "{}" | wc -l'
Let's break down each of these commands:
-
A similar find command was used as in previous examples.xargs:-print0is added to allow find to pass filenames with spaces and special characters to the next command.| xargs -0pipes the results from find into thexargsprogram.-0allowsxargsto read null-terminated filenames.-I {}replaces the{}characters with the filenames.sh -c '...'runs theshshell to execute the command following-c. -
A similar find command was used as in previous examples. Notice there is less syntax than theparallel:xargsexample above. This takes the results from thefindcommand, pipes it, and then runsparallelto execute the command within the single quotes.
parallel was designed after xargs to improve some limitations. For complex parallel runs, parallel is often easier to read and maintain.
You will notice in the previous two executions, xargs took a while to run, whereas the parallel command ran much quicker. This is because by default, parallel uses all CPU cores on a system. In contrast, xargs defaults to only 1 core. You can customize these options with the following commands.
find . -type f -iname "*.fastq.gz" -print0 | xargs -0 -P 2 -I {} sh -c 'echo -n "{}: "; zcat "{}" | wc -l'
find . -type f -iname "*.fastq.gz"  | parallel -j 2 'echo -n "{}: "; zcat "{}" | wc -l'
For xargs, -P 2 tells it to use 2 parallel processes. Likewise for parallel, -j 2 tells it to use 2 parallel jobs. Carefully look at how data is printed to the screen for each execution. Notice how the xargs command can interleave text, whereas parallel keeps output grouped in a cleaner way.
Now, let's say we want to run the same command, using half of our computer's resources. How would we do that for both xargs and parallel?
find . -type f -iname "*.fastq.gz" -print0 | xargs -0 -P $(($(nproc) / 2)) -I {} sh -c 'echo -n "{}: "; zcat "{}" | wc -l'
find . -type f -iname "*.fastq.gz"  | parallel -j 50% 'echo -n "{}: "; zcat "{}" | wc -l'
For xargs, we have to use the nproc utility to get the total number of cores on our system, then divide that result by 2 to configure xargs to use 50% of our cores.
For parallel, we simply have to configure it by changing the -j option to -j 50%.
However, notice that parallel keeps the filename: wc -l results paired, whereas xargs may not. When printing results directly to screen, parallel often handles output formatting better. If you are writing output files, either approach can work.
Now, let's clean up the empty files. For any lines that have "gzip: ./set4/SRR5130826_1.fastq.gz: unexpected end of file", please delete these files, then rerun the wc -l commands to make sure the data has been cleaned up. Now that we have a list of files, we could manually run the rm filename command, but let's have find delete these files for us!
find . -type f -iname "*.fastq.gz" -size 0 -delete
find . -type f -iname "*.fastq.gz"  | parallel -j 50% 'echo -n "{}: "; zcat "{}" | wc -l'
2. Symlinks and Hard Links
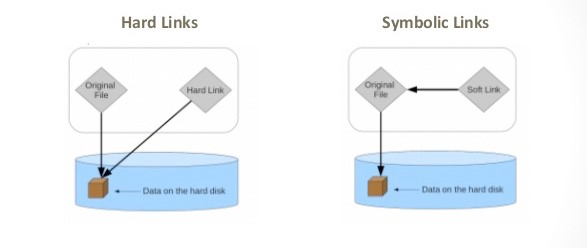
Since copying or even moving large files (like sequence data) around your filesystem may be impractical, we can use links to reference ‘distant’ files without duplicating the data in the files. Symbolic links are disposable pointers that refer to other files, but behave like the referenced files in commands.
Best Practice: Default to Symbolic Links
You should, by default, always use a symbolic (-s) link when working with sequence data.
Hard links point directly to file data on disk, while symbolic links point to a file path (the original file location).
The Drawback of Hard Links
Deleting the original file becomes much more difficult with hard links because all hard links need to be deleted first before the space is actually freed up.
(base) [user@login-0 testdata1]$ mkdir raw_reads
(base) [user@login-0 testdata1]$ find . -type f -iname "*.fastq.gz"  -exec ln -s {} raw_reads/ \;
(base) [user@login-0 testdata1]$ ls -alh raw_reads/
total 119K
drwxr-sr-x 2 user rc-group 8.0K Mar 21 13:31 .
drwxr-sr-x 7 user rc-group 8.0K Mar 21 13:29 ..
lrwxrwxrwx 1 user rc-group   28 Mar 21 13:31 SRR5130755_1.fastq.gz -> ./set1/SRR5130755_1.fastq.gz
lrwxrwxrwx 1 user rc-group   33 Mar 21 13:31 SRR5130761_1.fastq.gz -> ./set2/dir1/SRR5130761_1.fastq.gz
These linked files are blinking in red. It's because the symlink is relative, indicated by the -> pointer to the linked file. In order to correctly symlink this data, we have to include the absolute path, rather than relative path.
(base) [user@login-0 testdata1]$ find $PWD -type f -iname "*.fastq.gz"  -exec ln -s {} raw_reads/ \;
(base) [user@login-0 testdata1]$ ls -alh raw_reads/
total 119K
drwxr-sr-x 2 user rc-group 8.0K Mar 21 13:33 .
drwxr-sr-x 7 user rc-group 8.0K Mar 21 13:29 ..
lrwxrwxrwx 1 user rc-group   92 Mar 21 13:33 SRR5130755_1.fastq.gz -> /data/gpfs/projects/testdata1/set1/SRR5130755_1.fastq.gz
These linked files are not blinking red. This time the symlink points to an absolute path on the filesystem where the file is located. Now, we can treat these files as if they are present in the current directory.
3. Disk Usage Analysis: du, df, and ncdu
Monitoring disk usage is very important when processing data. Filesystems can quickly fill up when processing many samples. In order to monitor usage, UNIX provides two utilities: df and du.
The df utility stands for "disk free". This is used to find disk usage for any filesystems connected to the computer.
(base) user@node:~$ df -h
Filesystem              Size  Used Avail Use% Mounted on
udev                     63G     0   63G   0% /dev
tmpfs                    13G  3.4M   13G   1% /run
/dev/nvme0n1p2          1.8T  1.1T  682G  61% /
The du utility stands for "disk usage". This allows a user to summarize a directory or directory structure with total storage size of each directory. Let's run it on our test data.
The -h option outputs the storage counts in human readable format. We can also use the -s option to summarize only the folder described, rather than the directory structure.
(base) [user@login-0 testdata1]$ du -sh .
2.5G    .
(base) [user@login-0 testdata1]$ du -sh set1/
140M    set1/
The last utility is not installed by default on systems: ncdu. Let's install this utility with conda and explore using it.
(base) [user@login-0 testdata1]$ conda install ncdu
# OR
(base) [user@login-0 testdata1]$ mamba install ncdu
(base) [user@login-0 testdata1]$ ncdu
Challenge: Batch QC on FASTQ Files
Goal: Produce a one-line summary for each FASTQ file and save it to a report file.
find . -type f -iname "*.fastq.gz" | \
parallel 'echo -n "{}\t"; zcat "{}" | wc -l' > fastq_line_counts.tsv
Then answer:
- Which sample has the highest line count?
- Are there suspiciously small files that may be truncated?